

Rotary Tattoo Machine Setup
The use of rotary tattoo machines is increasing with the addition of features. The rotary machine is almost taking the place of coil machines. Their strategy for success is relatively straightforward: maximum flexibility at a reasonable cost. But there needs to be more clarity about how to get full benefits from its various features. The rotary is an innovation in the industry, but there needs to be a solution to setting up a machine. As mentioned, multiple features and how we can get results from these could be better for a beginner. You need not worry about this; we have the best rotary tattoo machine setup solution.
Rotary Tattoo Machine Setup
This article will explain how you can set your pen to get maximum output and exceptional results compared to a coil machine. There must be more than just a machine to be a successful artist. It would help if you also learned how to set up a machine properly. Better results for a machine depend upon how you adjust a rotary.
With the help of this article, you will find all answers related to rotary working, especially for beginners, and apparent confusion and basic instructions. As you know, a rotary machine is used for lining and shading. The machine setup for lining and shading is also different because there is a difference in needle depth. With the help of this article, you will be able to learn about rotary machine settings.
How to Set up a Rotary Tattoo Machine
After buying a machine, a question arises about setting up the rotary that gives us maximum advantages and overcoming its drawbacks. Here, we explained in detail how to set a rotary step by step for your better understanding. Just follow the given rotary tattoo machine instructions. You can select a rotary machine the same as a professional artist.

1. Clean your hands
Before holding the machine, you must clean your hands with antibacterial soap or liquid. Wear gloves to ensure the sterilization of the device. If you put disposable gloves on your hands, it will decrease the chances of infections.
2. Needle insertion in the holder
Insert the needle gently into the needle tube and tight accordingly. Insert needles gently. Never try to force the needle to enter the tube. The clip-on of most rotary machines must be opened by twisting it. To allow the tube to fit, slightly open it and step into the tube with the needle bar. You should now insert the needle cartridge into the grip. The moment the cartridge locks into position, you’ll hear a click.
3. Depths adjustment
Adjust the needle to the desired depth before tightening the grip. This alignment of the needles is adjusted with the last point of the cartridge, and you can modify it according to your preference and desire. If needles poke from the cartridge’s end and the machine is turned off, you have gone too deep. Needle adjustment is crucial in setting up a rotary because choosing the wrong depth may cause injury or not give you positive results.
4. Fixed the needle rod
It would help if you fixed the rod with rubber bands to avoid too much vibration during work. This practice will help you to decrease the vibration effects on the movements of the needle.
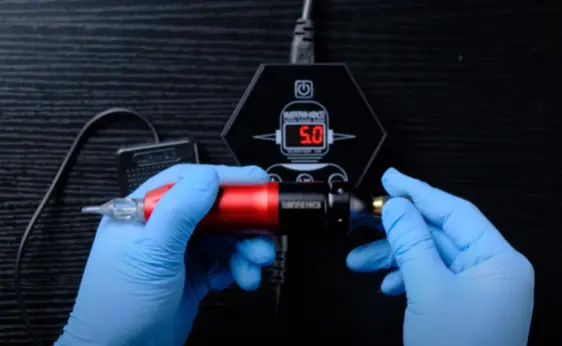
5. Attach power to the machine
Connect the power supply, attach the wire, and click it at the workplace. Check the capacitor’s voltage while connecting the tattoo machine to the power source via the clip wire. You can set the voltage according to your requirements. As you know, voltage is different for shading and lining work. Connect the RCA cord, and the attached wire will supply current to the tattoo machine. Furthermore, you can check out our recent article if you want to know about powering a tattoo machine without a power supply.
6. Wrap with a disposable grip
The firm grip over the machine depends on how you wrap a rotary with grips. You can cut a hole in the bottom of it for the grip to fit through. The bag is held in place by grip tape wrapped around the grip. You must use a disposable grip if you don’t have access to a sterilized grip.
How to Tune a Rotary Tattoo Machine
Like anything else, maintaining your tattoo machine involves an essential awareness of its parts and minor technical aspects. No matter how much you choose to go deep, it’s necessary to understand how to properly set up your tattoo machine before starting tattoo work.
1. Familiar with parts of the machine
Start by becoming aware of the machine’s three essential components. The three tattoo machine components we need to be acquainted with for this basic configuration are the contact screw, the front spring, and the armature bar. Remember to keep the armature bar depressed when raising or lowering the contact screw for the task.
2. Set the gap
For fine lines, you want to set the gap between the front spring and the contact screw to about a dime width. Nickel width is appropriate for doing shading. After you’ve selected the desired aperture, always ensure to tighten the contact screw’s locking device.
3. Testing
Check the functionality of your tattoo machine’s new configuration while beginning your job. Switch everything on to check if you’ve connected your tattoo machine properly. It should connect its foot pedal and clip wire to the device’s power supply. Always keep the armature bar pressed to remember what type of operations you are doing.
4. Safety
Always keep In mind the safety of yourself and your customers. Because due to improper settings, you can face serious issues. So always set your safety as a priority to overcome any mishap.
How to Set Up Dragonhawk Rotary Tattoo Machine
You will experience tremendous discomfort if your tattoo machine is improperly configured or incorrectly set. You can only get results if you know how to set up dragonhawk tattoo kit; it is compulsory to put all its parts by following the proper mechanism. Setting up a dragonhawk rotary machine is similar to other pen-style rotaries. The dragonhawk is more likely to be your machine of choice whether you’re a beginner or wish to tattoo yourself.

Compared to traditional machines, Dragonhawk rotary machines run smoothly and silently and are generally easier to set up. When you start working and pick your Dragonhawk rotary, you must follow these essential points to get your machine on standard configurations.
Almost all rotary machines are set up as we explained above; some points are given below.
1. Knowing your expertise
1st of all, you need to judge yourself with experience. If you are familiar with Dragonhawk, it is very well. You must learn and read their user manuals to gain prior work experience.
2. Understand tools and their working
Always ensure you know all the tools if you’re new or a pro. Sometimes, the same machine category comes with different tools due to advancements. It’s compulsory to familiarize yourself with the tools used with the device.
3. Clean tools and your hands
Always use sterilized tools to prevent any severe infections if someone is affected by your machine. It may cause a loss of your business and reputation. So always, before using a device, wash your hands with sanitizer and sterilize your mechanical equipment.
4. Setting up the grip
You need to set the grip and tube to your preferred length.
5. Needles insertion
Insert needles of your desired size into the tube of the machine.
6. Adjust needles and nibble
Nibble is used to set your machine grip and helps adjust the needle’s length according to your design.
8. Set the power supply
Choose the best power step to power your machine. After connecting all tools properly, you can test your device to check if it works correctly.
How to Set Up a Stigma Rotary Tattoo Machine
Almost all rotaries set up are the same. There is no significant difference in rotary machine configurations. To set up your stigma machine, follow the process mentioned above.

how to set up wormhole tattoo machine
The wormhole tattoo machine configurations are almost the same as all pen-style machines. The step-by-step configuration is discussed below.
- Use gloves
- Setting up the grip
- Needle insertion
- Needles adjustments
- Set the power source
- Ready to operate
people also ask
conclusion
This discussion elaborates on the rotary tattoo machine setup with proper instructions. After fulfilling these instructions, you can start tattooing by connecting your machine to a power supply. To safeguard you and your client, always make sure to work clean, hygienic, and as sterilely as possible. Your tattoo machine should be sanitized, cleaned, and sealed after each session to avoid any mishap in the device.