
How To Make A Power Supply For A Tattoo Gun
We know tattooing is a unique art, and buying equipment requires a lot of expenses. The power supply is the main component of the tattoo machine. If your machine’s power supply gets damaged or you need more money to buy a new collection, you may lose your business and clients if you need a source to power a tattoo gun. Here, we will guide you on how to make a power supply for a tattoo gun. You can make a dependable power supply by following our guide about making a power supply.
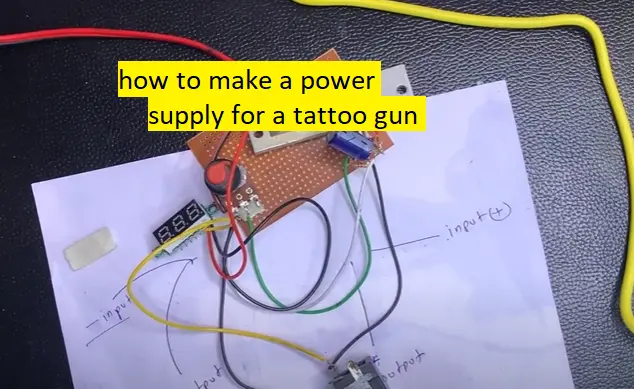
how to make a power supply for a tattoo gun
Building a power source for your tattoo machine may be challenging yet rewarding. It calls for some personal know-how and an essential understanding of electronics.
The art of tattooing is expressive and requires skill and talent expertise. Having a trustworthy and functional power source for your tattoo gun is one of the most essential parts of tattooing. This article will show you how to straight-wire a tattoo gun if you’re a tattoo artist seeking a practical option.

Components of a Power Supply
Components of a Power Supply
A tattoo machine’s power supply consists of the following few essential parts:
1. Transformer: This part transforms your power source’s input voltage into an appropriate output voltage for your tattoo machine. Step-up and step-down transformers are only two examples of the various sizes and types of transformers.
2. Rectifier: This component converts the transformer’s AC voltage to a DC voltage that can operate a tattoo machine.
3. Capacitor: By storing electrical energy, Capacitor balances out the DC voltage and ensures the machine receives a constant voltage supply.
4. Controller: This controls the tattoo machine’s speed and the voltage output.
Materials needed
1. Transformers: A transformer for tattoo machine power supplies is available online and in electronic supply shops.
2. Diode: Utilising diodes, the rectifier might be constructed. For this project, four 1N4001 diodes are required.
3. Capacitor: For the power supply, a 1000 microfarad (UF) Capacitor works well. This component can be purchased online or at an electronic supply store, although you can recover it from an old electrical device.
4. Controller: The voltage output is controlled using a voltage regulator or a variable resistor. You may recover this component from an old electrical gadget, but you can also buy it online or at an electronic supply store.
5. To connect each of its parts, you will need wires, a soldering iron, and a solder
Building Your Power Supply
Once you have all the necessary supplies and parts, you may begin making your power supplies:
1. Mount your transformer: The transformer should be installed inside a metal box, such as an electrical connector box. The boxes are required to prevent electromagnetic interference and safeguard against electrical shocks.
2. Solder the diodes: Repeat with the remaining two after joining the first two. The two pairs of diodes can be connected to create a full-wave rectifier. Connect this to the transformer’s output ends.
3. Solder the Capacitor: Connect the machine’s negative terminal to the machine and the Capacitor’s positive terminal to the rectifier’s output.
4. Connect the controller: Connect the Capacitor to the controller. To regulate the voltage output, you must adjust the potentiometer itself.
5. Test the power supply: Before utilizing it to run your tattoo machine, test it after building it and connecting all components. The DC output voltage should be measured using a volt meter.
Safety measures
It’s important to remember to be cautious when working with electrical parts. Consider the following recommendations:
- Before working on the power supply, always disconnect it.
- Stand in a dry area or use a rubber mat to prevent electrical shocks when working.
- Be careful when soldering and cutting wires to prevent harm and potential fire dangers.
people also asks
Final Thoughts
Making your power source for your tattoo gun might be more affordable than buying a readymade one. You can build a dependable power supply that will assist you in getting the required outcomes if you use the correct materials and take the necessary safety precautions. You can make the power supply home at a reasonable price by following simple steps as we discussed above.
In this article, we tried to convey a detailed lesson about how to make a power supply for a tattoo gun. Please don’t hesitate to contact us for additional inquiries about tattooing or power supply settings. Thanks for reading!